23. Exporting data
Export (filtered) normalized data for additional analysis outside of R2
23.1. Scope
- Export gene expression data with the ‘Data Grabber’ functionality directly from the main menu of R2 (http://r2platform.com / http://r2.amc.nl)
- Export focussed gene expression data in R2 after an analysis (result).
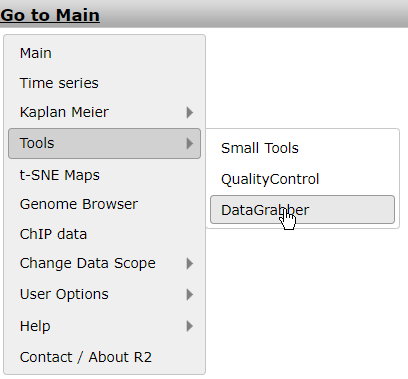
23.2. Step 1: Using Data Grabber
In the main menu select ‘Tools’ > ‘Data Grabber’. A dropdown menu appears from where you can select the dataset of interest and click ‘next’.
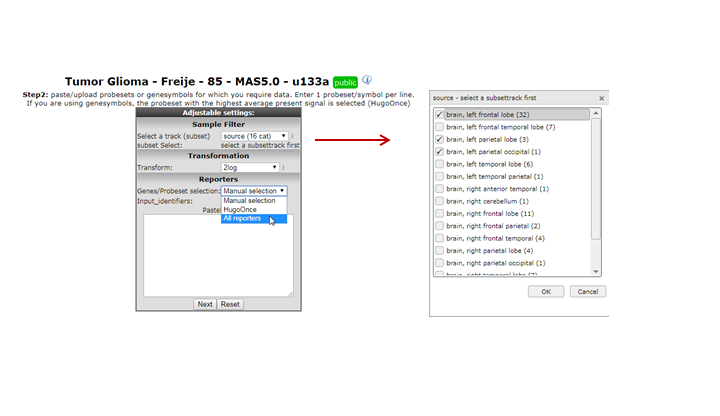
A settings menu appears where several filter options can be applied to the data you want to export. You may optionally select a track (subset) to filter the samples by the annotated groups; in this example select “inss (cat)” and select one or more stage(s). Be sure to click the red ‘confirm’ link to enforce your selection before proceeding.
In the ’reporters’ section, by default, a specific set of reporters (either reporter names or genesymbols) can be selected via copy/paste a set of genes in the “input_identifiers” box. Another option for the reporter selection would be the ‘HugoOnce’, where only a single reporter is chosen for all of the genes annotated within the dataset, and where orphan reporters are omitted. In this example we are interested to perform an additional analysis outside R2 with all reporters for several stages. In the menu select “HugoOnce” and click ‘next’.

A “datagrabber.txt” hyperlink is generated on the fly and appears on your screen. Right-click the link and store the tab delimited file with expression data on your hard drive. In case a dataset contains more than 60.000 reporters and/or exceeds 300mb in size, then R2 only allows up to 60.000 reporters to be exported. This restriction is imposed due to the large file-sizes which would have to be created. You can always drop r2-support a note, if you require these large datasets as a whole.We will then dispatch those via other means (via a file transfer service).
23.3. Step 2: Other formats: TMEV, tab separated, etc
The example listed above shows that R2 facilitates the export of data without performing any analysis. Of course you may want to do the same after analyzing data in R2. In most of the analyses options you can export the data via the right menu.
To illustrate this option. Select in the main screen in box 3 “Find Correlated genes with a single gene”.
Type “MYCN” in box and click ‘next’, in the next screen leave all the selection criteria at their default settings and click ‘next’.
A list of genes significantly correlating (up and down) with the MYCN gene is generated. The right menu provides you with a set of options to continue your analysis including exporting data.

Click on “MakeMeATable (TMEV) ready” in a new (tab) screen you can download the table matrix with the corresponding annotation by using the right click of your mouse. The generated table can be used directly in external programs such as the commonly used clustering program as the TIGR Multi experiment viewer (TMEV) which is freely available.
Try also the other options listed in this menu, ‘save current ….’, ‘reference for …’ and “Store results …. These are all different formats to export your results for use outside R2 or store in R2 to continue your analyses at a later time-point.
![]() Did you know that you can export data from different types of modules?
Did you know that you can export data from different types of modules?
Using a different module such as “Time Series” also provides the option to export the results of use outside R2 or at a later time point within R2.
Note: If the requested file size exceeds ~200MB, R2 will terminate the request because of the system load. Or course there is a workaround by mailing the r2-support@amc.nl and request for the dataset expression values of interest.
23.4. Final remarks / future directions
We hope that this tutorial has been helpful,the R2 support team.